How To Determine If Your Troughs Need Additional Airstones
How to determine if your troughs need additional airstones: You can determine if you need aeration in your troughs by measuring the DO going into the trough, and comparing it to the DO going out, but the system must have mature plants in it for this to be useful information. Plant roots use oxygen, right? If you only have a bunch of little sprouts in your system, they will be using a smaller amount of oxygen than when they are fully-grown and your system is in a mature condition. Measure your DO when you have a mature system with a normal range of some sprouts, some middle-sized plants, and some mature plants in it for accuracy. We’ve seen the aeration requirements and DO change radically in system troughs in relationship to the size of the plants (biomass) in them.
(Below) A trough airline valve, with the 1″ PVC airline going off underwater towards the far end of the trough.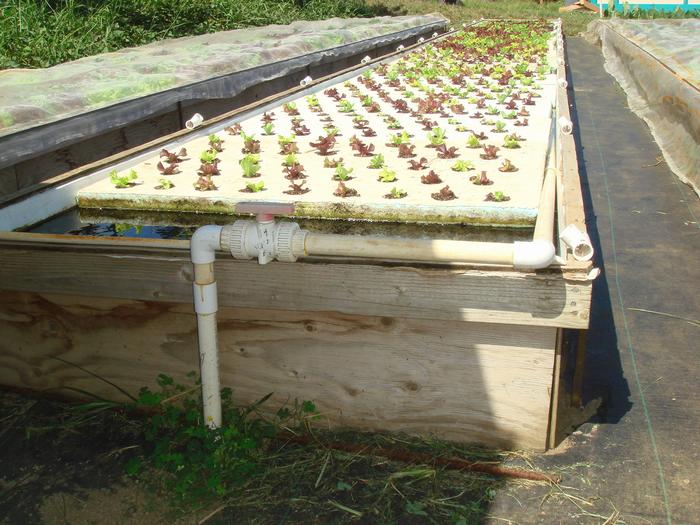
If you have a mature system, and have 5.0 ppm DO (or under) going into a trough, and 2.0 ppm DO or under in the water going out of the trough, your plant growth will benefit hugely from some additional aeration in this trough. If you have 5.0 (or more) going in and 4.0 (or more) going out, you are just fine and additional aeration won’t make any difference. We LIKE seeing DO’s of 4 to 5 ppm or higher going OUT of a trough, and feel very comfortable then.
If you put your blowers on a manifold as we suggest, and put in large enough main schedule 40 white PVC airlines to all your tanks and troughs, you will be able to easily increase the aeration to any location in your system if need be by simply drilling and tapping a few holes and installing more airstones there, then turning on a different combination of blowers that supplies more air.
IMPORTANT! Even if you think you won’t need air to your troughs, to be absolutely safe, run a 1-1/2” airline off your air manifold, with a 1-1/2” valve on it, to the head of all your troughs when you are building your system, and stub out 1” PVC risers with a 1” valve on each one off the 1-1/2” pipe right next to each trough. Cap the 1” risers off at the top of each trough; then the air is there if you need it. More in the construction manual on this!
IMPORTANT QUESTION: Is there a formula for the amount, size, and spacing of airstones to achieve adequate aeration? Unfortunately, it’s not that simple, and YOU have to figure it out for YOUR system: it will vary for every water temperature, plant species, and system, depending on many interdependent factors. Fortunately, it’s easy to do so: if you don’t have adequate aeration in the fish tank or troughs, just add some more by adding more airstones. Just make sure to add an additional air pump or increase blower size at the same time, because just adding airstones is like just adding wheels to a car; twenty wheels won’t make the car go any faster, but a second engine will!
If you have an existing system and you’ve measured the DO exiting your system troughs at less than 4.0, you need more aeration in the troughs. Here’s how you do it for large commercial systems with troughs of 40 to 100 feet long:
Plumb the system with a 1” PVC airline to the head of each trough with a 1” valve on it. This valve is important because you MUST be able to adjust the amount of air going to each individual trough’s PVC airline. If you have four to six troughs hooked up to a single supply airline, and NO valves, the air will pick the EASIEST airline (with the least resistance) to exit through, leaving no air going out the airstones in the other troughs. The valves at each trough allow you to adjust the amount of air going to each trough by “choking down” the air going to that trough so it is evenly distributed.
IMPORTANT EXPLANATION! Even if you just have ONE trough, you would still need this valve installed on its airline to adjust the air. Here’s why: air acts as if it’s lazy! It’s so much easier for air to get out through airstones in 10 inches of water (less water pressure there) than it is for it to get out through airstones in 40 inches of water (more water pressure there), that unless you have a valve at the trough to choke it down, all the air will come out through the trough airstones where it’s easy for it to come out. NONE will go to the fish tank. Choke down the 1” valve at the trough until you can see a good stream of bubbles coming out of the airstone that is farthest down the trough airline away from the valve. This is how you know it’s adjusted just right to create optimum DO’s.
When you have each individual trough airline adjusted this way, re-check the last airstone in all the troughs to make sure enough air is still coming out of it. You may need to re-adjust the valves to fine-tune a few times, because changes in one trough always affect the others. If you have more than one system running off a large common air manifold, re-check the other systems, because changes you make in one system’s settings will affect them all.
The airline in each trough is 1” PVC for the first quarter of the trough, then three-quarter inch PVC for the rest of the way to the end. We have 78-foot long troughs, and we start by putting four AS8L airstones (Aquatic Eco catalog number) on this line at ten-foot spacings, AT THE END OF THE AIRLINE NEAREST THE WATER INFLOW FOR THAT TROUGH, with the first airstone located right at the inflow end of the trough, and each subsequent one ten feet further down the line. This way, the air is going into the water as soon as it enters the trough from the previous trough, and the DO generated from this persists to the end of the trough and beyond. Then we let the system run for a day or so to let the DO levels stabilize and re-measure DO’s in the troughs.
IF, after we’ve done this, we find DO is not in the desired range when leaving each trough (4-5ppm), then we add airstones one at a time to the PVC airline in each trough until the DO reaches this desired range. We put our first additional airstone (if needed) in between the 10-foot and 20-foot airstones, the second one between the airstones at the 20-foot and 30-foot airstones, and so on. DON’T put airstones in near the OUTFLOW end of the trough, you’ll probably be wasting electricity! If you measure DO, find that it’s low, and need to install these additional airstones, put them in as explained here: between the middle of the trough to the inflow end of the trough, NOT near the outflow end.
IMPORTANT- How to install airstones in the troughs! We drill and tap an Aquatic Ecosystems 62006 fitting into the PVC airline every ten feet so it is facing down at a 45-degree angle towards the bottom of the trough. We install the BTV40 quarter-inch airstone tubing onto this 62006 fitting, and put a three-quarter plain STEEL threaded nut (NOT GALVANIZED, this brings toxic ZINC into your system) onto the airline tubing right next to the airstone to hold it down onto the bottom, because the “float” from the air inside the buoyant airline tubing is sometime enough to lift it vertically off the bottom so the airstone’s bottom can rub a hole in the bottom of the trough. You also may want to add more steel nuts on the body of the airstone tubing to keep it down on the bottom of the trough; if it floats up it gets tangled in the roots growing down from the plants on the rafts above, and when you harvest and move rafts, the airstones get dragged all over the place.
IMPORTANT! We also install two DB10 airstone bumpers onto each airstone so that it won’t rub a hole in the bottom of the trough even when sitting properly sideways on the trough liner bottom.
IMPORTANT! Make sure when you put the airstone into the trough you don’t just toss it in! Get your arm wet and place the airstone gently, HORIZONTALLY on the DB10 bumpers, onto the flat bottom of the trough in the middle of the trough. Otherwise it’s possible it will end up sitting on its end and rub that hole in the bottom of the trough you were trying to avoid with the DB10’s. It may get disturbed each time you move a raft with a bunch of hanging plant roots over it, so you need to reset it every time you harvest to make sure that you don’t leave stones on their ends rubbing holes in your liner!
In practice you need to be aware of your DO throughout the year, and not just assume that a good DO experienced in one season means that your DO in other seasons will be as good. You may need to turn on an additional blower and/or add airstones during the summertime to keep DO’s in the safe range of 4-5 ppm in your troughs, and 5-6 ppm in your fish tank as your water warms up.
Leave a Reply